31.12.13

HUGE Illamasqua Haul


My love affair with Illamasqua is very well known so it was only right a haul would be due soon and here it is! I got quite a lot of Illamasqua gift vouchers for Christmas as I really wanted to add some new items to my pro kit. So on Christmas Day I placed this HUGE haul! On Christmas Day to Boxing Day Illamasqua was offering 10% off on all purchases, and as I get 20% professional student discount that was a total of 30% off on my total order! EEK! This is the biggest amount of items I have ever bought from a make-up company in one go and I can't tell you how excited I was to receive the parcel! As soon as it arrived I took pictures so I could go use it all straight away! When the parcel arrived the sun was setting so the picture quality isn't amazing and I had to move all around the place to try and get the best lighting, so I'm going to apologise for that now! Do not fear though as I will have a swatches post coming soon of my favourite items! 


Illamasqua Skin Base - £27
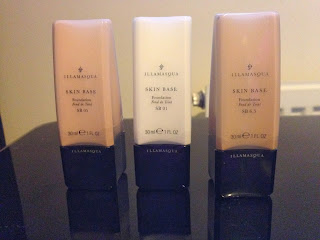
L-R Skin Base 05, 01, 6.5

I decided to pick up 3 shades of the Skin Base as I am currently trying to build up on my 'No SPF' foundations for my pro kit. Illamasqua Skin Base is quite highly regarded in the make-up world as it claims to have a primer and concealer built into it but still leave the skin looking like 'skin.' I have tried this on myself but being super oily it hasn't worked out but most of my clients have combination or dry skin and this will work beautifully on them. I purchased the shades 05 which as you can see is a pink toned foundation. I also picked up shade 6.5 which is quite an olive yellow toned foundation. Along with these I picked up Illamasqua's skinbase in 01 which is white. I can use this to mix lots of shades with just these two foundations and also use it to lighten up any other foundations I have already.


Illamasqua Rich Liquid Foundation - £25


L-R 140, 200

Rich Liquid is an extremely high coverage foundation. On Illamasqua's website it is shown being used to cover tattoos, that's how much coverage it has! Whilst being a full coverage foundation it claims to still look natural on the skin without being cakey like some other foundations can be. This is a foundation I have personally wanted to try for a long time as I love fill coverage on nights out/special occasions but have never tried any without SPF and I'm sure everyone hates a flashback face just as much as me! I picked this up in shade 200 which is my fake-tan shade and 140 which is a tiny bit darker than my natural colour and can be used under the eyes as a highlight when I'm tan! This is the product I'm most looking forward to trying!


Illamasqua Skin Base Lift - £16


Light 2
I believe this is a relatively new product that Illamasqua have released to work alongside their Skin Base foundation. This is a corrector to be used underneath the eyes to 'lift' the appearence of your eye area. Skin Base Lift has strong peach tones which will counteract them pesky dark circles! I believe this is a similar product to the Bobbi Brown Corrector which is a pretty hyped up product so I am looking forward to seeing if this banish's them dark circles! This also comes in a white shade which I would like to pick up next to mix shades up and brighten the under eye even further!


Illamasqua Powder Eyeshadow in Vernau - £15.50


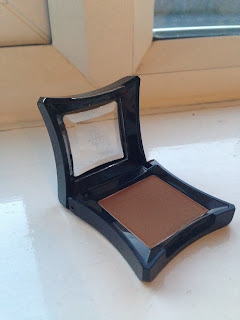
This is a shade I tried to pick up on my last visit to the Illamasqua store in Liverpool but they were sold out. The camera isn't really showing this shade very well at all. The true colour of this is a mustard brown shade. I thought this would be a beautiful shade to blend out a dark smokey eye due to the undertones of this shadow. I have used some of Illamasqua shadows before and they have all been amazingly pigmented and you only need the smallest amount so these will really stretch a long way. I'm probably going to de-pot these into a Z palette when I have enough shades! 


Illamasqua Powder Eyeshadow in Wolf - £15.50


This colour should be a staple in any make-up lovers kit. A deep chocolate brown shade can be used to create a number of looks! I have one very similar to this from MAC in the shade 'Espresso' but having tried 'Wolf' out already I can tell it's so much more pigmented than MAC's. I love this type of colour for going into the outer V of your eye as an alternative to black.


Illamasqua Power Eyeshadow in Servant - £15.50


This shade is a beautiful creamy peach shade which is beautiful for all over the lid when your having quite a neutral day but want to put  something on the lid. It doesn't really transfer as bright as it's showing in the picture but I can't wait to pair this on a casual day with Vernau in the crease.

Illamasqua Pure Pigment in Furore - £16.50


This is my second purchase of a pigment from Illamasqua. After owning my first pigment I knew I had to have more. I picked up Furore as it is a beautiful beige toned glitter which I thought could be applied lightly in the day for a neutral glittery look but then can applied heavily at night for the full on glitter look! You can use these dry and just pat the product onto the lid with your ring finger or for a more intense sparkle you can dampen your brush and pack that glitter on. The pigment is so finely milled it really does sparkle, not like some glitters which can be really chunky and uncomfortable to wear on the eyes.


Illamasqua Eye Colouring Pencil in Vow - £14


I have heard quite a lot about this pencil upon the blogging scene and most recently Caroline Hiron's recommendation on this product. Vow is a flesh toned pencil perfect for using in the waterline when you haven't had much sleep or just want to make your eyes appear larger and brighter. I have heard of people using this around their brows to sharpen them up and also as a lip liner when wearing a nude shade or to cancel out the lip colour. Got to love a multi purpose product!


Illasmasqua Brow & Lash Gel - £11.50


My brows are very unruly and need quite a bit of taming so a brow gel is a staple product in my make-up routine. I have been using the MAC Brow Gel for just over a year but thought I would give this a try to see how it holds up compared to that. I love the packaging of this compared tot the MAC one as MAC's come in a see through bottle which kind of looks disgusting after using it a few times as all your brow powder turns the gel a brown colour! Thankfully this will now be hidden in the sleek black packaging.


Illamasqua Powder Blusher - £18

L-R Hussy, Lover, Intrigue

I am yet to try any of Illamasqua's blushers but have seen them in action in demo's I have had in store and they always look beautiful when applied. I picked up the shade Hussy which is a bright pink but in the picture looks quite red which it's not at all. Damn you lighting! This can be applied very heavily or really softly to give the desired look so never be put off by the colour in the pan! The next shade is Lover which is a Peach toned blusher. I love anything that has a peach colour to it so it was only right I picked this up. I can see this being one of my favourites! The last blusher I picked up was Intrigue which is actually pure white which may seem quite strange. It was to me too when I first seen it! I attended a demo at Illamasqua in Liverpool with my college and the amazing Make-Up Artist Christina used this as an eyeshadow all over the eye to give a really bright white appearance and then did the most beautiful cut-crease! She also used this as a brow bone highlight and on top of the cheekbones! Illamasqua do a white eyeshadow called 'Sex' which is exactly the same as Intrigue blusher but you get a lot more product with the blusher for a tiny bit more money! It's also worth noting these blushers are all Matte finishes! I prefer to add my own highlight where I want it rather than having a whole load of shimmer on my cheek! 

Illamasqua Lipstick - £16.50

L-R Obey, Over, Fable
Lastly in this haul is the Lipsticks! I'm really disappointed as the colours haven't shown up how they look in the tube but the jist of it is still there. I'm going to do a separate post of all my Illamasqua Lipsticks including swatches to show you them better than they appear now! Obey is one I have been lusting over for the longest time, it is a true peach shade which may not suit everyone especially if your pale, but if you have a tan this will look amazing! Over is a beautiful coral shade which would look amazing in the summertime! Finally Fable is a Pink shade, it's quite hard to describe, it isn't barbie pink but it also isn't fucisa pink it's kind of a mix of both. Sorry for the lame description! All of the Lipsticks are a Matte finish and I would advise your lips are very well moistourised before applying these as it will cling to any dry patches you have! 


Phew that was a long one! I can't wait to try all this make-up it feels like Christmas again! As you can tell Illamasqua are my holy grail and I will always try out any products they release! I hope you enjoyed this as much as I did writing it! Until next time x

Illamasqua products are available to purchase here


30.12.13

MUA Luxe Velvet Lip Lacquer


I have seen many pictures of this MUA Luxe Velvet Lip Lacquer lurking around Instagram and loved the results it seemed to give, but with a lot of Instagram pictures being heavily edited I had my doubts. I popped into Superdrug and had a look at the shades they had available, unfortunately there was only one in stock which was  'Atomic' which I would describe as a red with a strong orange undertone. I was surprised to see the price at £3 which I think is an amazing price.

As soon as I got home I had to try this, so please forgive me for not having the original packaging to take photo's of! It is a lovely cardboard box though! I heard through Instagram it works best with a lip liner, so I applied MAC Cherry all over my lips then applied the Lip Lacquer straight on over it. I didn't really like the lip liner with it though as it was 2 different shades so off the lip liner come.

I then re-applied the product straight on-to bare lips with the wand and the finish was lovely. It was a little tricky getting into the corners so using a lip brush will definitely help with this! You do need to work VERY quick though as the product applies like a gloss and sets to a matte finish very quickly. If  you mess up it can go quite patchy and re-applying over the top made a complete mess when I tried it.

This is definitely like a lip stain. Once the lacquer had set to a matte finish it was completely transfer resistant and survived a meal and also drinking which is a huge plus!

If you have dry lips make sure you use a good scrub first as this will cling to any dry patches you have and make your lips look quite naff!

Overall this product is an absolute bargain for £3 so I will be picking up the other 4 shades in the range for me and another set for my pro kit whilst I wait ever so patiently for MUA to release more.

You can pick up MUA Luxe Velvet Lip Lacquer here


29.12.13

Dr Martens Serena 8 Eye Boots


Bit of a different post today guys but I thought I would show you what I got for Christmas. I have been lusting over these boots for a good few months and was so happy when I received them. I have a pair of the Dr Martens 8 eye boots in matte black already but they are massive on me. I got them in a size 5 as I am between a 4/5 but mostly swaying to a 5 as I have quite wide feet so need the extra room to accompany that, but the size 5's actually look like boats on my feet. I am very short, 5'0 to be precise and they just make me look like I have shoes 4 sizes to big on my feet :(.

So this Christmas I asked for the Serena's in size 4. You may think I'm crazy as they look exactly the same but I loved the fur inside them. I thought they would be amazing for winter and looked soooo comfy. On the website they were also shown with the boots folded down to show all of the fur which I thought would look lovely with some leggings and a jumper. Very wintery indeed.


The boots fit me perfectly in the toe area but are a bit tight around the width because of my Shrek feet so I will need to break them in. I wore them on Christmas day with a skater dress and tights and didn't get any blisters which is good news for my feet. Although I did suffer a bit of cramp lol!

The boots retail for £10 more than the original pair at £110 but as with all Dr Martens the quality is amazing and they will honestly last you a lifetime if you take proper care of them! My next mission is to venture out of the black zone! It's all I wear! Eeeek!

The Serene 8 Eye Boots are available to purchase here
What are your favourite pair of Dr Martens?


27.12.13

Face Lace


As you may or may not know I am currently in college training towards my make-up artistry qualification. I actually finish my course in July 2014 and I can't wait. Without sounding up my own arse I am very confident with make-up and have been self-taught for a number of years but I wanted to go to college to gain my qualification which hopefully will help me get my foot in the door with companies such as Illamasqua (who are my dream to work for.)

As part of my qualification I have to do numerous assessments to pass the course and my most recent was a Face Lace assessment. I had never tried Face Lace before but was quite excited to try it! Our awesome tutor actually got us all one each to use which was so kind of her as they are super expensive. We were given the design a week before our actual assessment so we could plan our look. I would describe my Face Lace as a peacock style. I have included a picture of the actual design off the Face Lace website as being the bad blogger I am forgot to take a picture before.


We had to provide our own model so I asked my beautiful friend Jodi-Lei to be mine. She is mixed race and has the most perfect skin. I really thought the black Face Lace would contrast well with her skin tone. I decided to keep the eye make-up simple as there was so much going on with the eyes and just do a simple winged liner. To make it stand out that bit more I decided to add a bold lip. I used MAC Rebel which I love!

The application of the Face Lace was quite tricky. Peeling it off the plastic backing was an absolute nightmare. Obviously it is very sticky so it sticks to your face but when your peeling it off it sticks to every bit of your fingers, when you try peel it off your fingers it sticks to another part. It is so fiddly as I was trying so hard not to rip the delicate piece but let me tell you for all that trouble the end result is defiantly worth it! Face Lace also provide you with a bottom lash sticker which completes the look perfectly.

In the studio for head-shots

We then got to have our finished pieces photographed in the photo studio and I am currently waiting on the final edited pictures which I am hoping to have in my portfolio! I have included some pictures I took on my phone and I'm sure you will agree this is a beautiful look and would be amazing for a masquerade ball or if your feeling extra dramatic! I really can't wait to stock up on some more designs for my kit and use them in future looks.

Face Lace is available to purchase here

Have you ever tried Face Lace?

26.12.13

Lush Haul

I had a cheeky trip to the Trafford Centre the other day and surprisingly I was quite well restrained in all the shops apart from Lush, my addiction to there is becoming out of hand. I picked up a few bits which I have heard good reviews about. I always tend to read reviews before I buy products as I get an idea of if I will like it or not and then its less money wasted! Yay!


Tea Tree Toning Water


I picked this up as I heard it is amazing for oily skin and keeping your skin matte and is aimed at blemish prone skin which I defiantly have. I have been using this for just over 4 days now and my first impressions are that it makes my skin feel so fresh. The product comes in a spray bottle which I actually really enjoy. The packaging says to spray the toner onto a cotton pad and wipe across the face which I don't do. After scouring the web for reviews I found most people spray this product directly on to the face and this seems to be working great for me! Also the biggest bonus of this product is it keeps my skin really matte and preps my skin beautifully before applying my foundation.


 Mask of Magnaminity Face & Back Pack


This face mask is targeted at people with acne/blemish prone skin to attack your breakouts and return your skin back to it's naturally beautiful state. I have never tried Lush standard face masks, I have always had the fresh one's but found I wasn't using them enough and they was going out of date. I got this mask for when my skin decides to have a sudden break out and I need to clear it up ASAP. It has a lovely scent of peppermint to it and smells very refreshing. I like how you can use this mask on your back too if that's a problem area for you. I don't think it would be fair to review it now as I have only used it once so hopefully I will love this and be able to post a rave review soon :)

Snow Fairy Shower Gel


Snow Fairy is my ALL TIME favourite scent from Lush (damn you Lush for only bringing it out at Christmas.) The scent is quite an acquired one as it is very sweet. It smells just like bubblegum which I love but I get why many people don't. It leaves my body smelling exactly like it afterwards which is a key factor as I know a lot of shower gels don't! This is a must-have product for me and I will be stocking up before the Christmas Collection is finished.

Magic Wand Bubble Bar


After saying in a previous post i'm not a bath person, what do I do? Decide it's a good idea to buy a bubble bar for baths I don't take. I will be honest and admit I was drawn in by how pretty and girly it was! The fact it smells of 'Snow Fairy' helps too. I shall have to get my first bath in a long time to try this out I think. I couldn't resist!

I need to put myself on a Lush ban and just stop going in there. They make such amazing products it's hard to resist! Also lush give samples on most of their products so if your ever unsure always ask for a sample!

You can pick up Lush products here

What's your favourite ever Lush product?


2.12.13

MAC Rebel


I bought this lipstick at the start of the summer and I haven't really got much wear out of it, until recently. It's got quite a name for itself in the beauty blogging world and rightly so! It's a little gem! I can wear this so it's quite sheer for a daytime look or I can go all out for a deep vampy look. When I don't wear fake tan I am very pale (think Marilyn Manson, especially with the black hair) and paired with this lipstick it can give me quite a gothic look which I really like with a bit of an edgy outfit. 

Rebel is a satin finish and as with all MAC lipsticks they are super pigmented and very long lasting. The only downside is it can be a little drying after a few hours and my lips can end up looking a bit patchy which isn't a sexy look! I would recommend making sure your lips are super moisturised! 

In the tube Rebel looks very scary but on the lips it transfers as a purple plum colour which has quite a pink tone to it as-well! The more you apply the deeper it will go.


in the first picture I applied just a sheer amount for every day wear.


In this second picture I applied NYX lipliner in Auburn around my lips and also filled them in and then applied a generous amount of Rebel on top. 


I think this is a great Autumn/Winter shade and will look great on all skin tones

You can pick up Rebel here for £15 (MAC lipsticks will be £20 before we know it)

What's your favourite winter lipstick shade?


30.11.13

L'Oreal Skin Perfection 3 in 1 Micellar Solution


I have been planning to post a review on the L'oreal Micellar Solution since the day I tried it. I wanted to compare it against my beloved Bioderma but really wanted to give it a fair review so I have been using this for just over 2 months time now. I picked this up as an alternative to Bioderma as Bioderma is so difficult to get hold of and the total when P+P is added really put me off. 

If you don't know what either of these products are where have you been hiding ;). It's basically used to remove all traces of make-up and draw out excess oil whilst being gentle on the skin. These type of products are loved by many including top make-up artists who use them on fashion shoots/catwalk as a quick way of removing make-up to prepare the skin for another look!


Before purchasing this I was using Bioderma for around 6 months and it was my holy grail pre-cleanse, or my total cleanse on lazy days (naughty I know.) It was perfect for removing all my make-up and preparing my skin for a deep and thorough cleanse without making my skin sensitised. 

As I mentioned Bioderma is really difficult to get hold of in the UK. I was picking mine up on Ebay for  around £14 but then paying an extra £3 for delivery so the total was coming in around £17 for a 500ml bottle. I'm not a very well prepared person so would find I would have finished a bottle and then have to wait for another to be delivered and in the mean time I was bioderma-less. Quite a lot of people pick this product up in France as it is so cheap over there but sadly I have never been to France nor do I know anyone that does go! 

When I heard L'oreal were releasing a Micellar Solution I was super excited and hoped it would be just as good as Bioderma. The fact I can just pop to my local supermarket or boots/superdrug also made me very happy. The bottle comes in a 200ml size and retails for £4.99 although I have never paid this much. I always find it on offer in one of the stores and can usually pick it up for around £3.50 which makes it a lot better value for money than the Bioderma.

Overall I would say they do the same job and my skin didn't react to them any differently. They both remove my make-up just as well and I wouldn't be able to tell the difference on the skin. The one thing that lets the L'oreal down for me is that it can sting my eyes when removing eye make-up which the Bioderma didn't! This isn't a major issue for me but I want a product I can use on my clients as-well as myself to allow them to remove their make-up quickly but I wouldn't feel comfotable giving them the L'oreal purely for that reason! Therefore I will be sticking with my Bioderma especially with my clients and on my eyes but I now have a back-up for my ill prepared moments when I run out!

Have you tried either of these? What ones do you love?

Also if anyone knows of any cheaper sites than Ebay PLEASE let me know!


29.11.13

My HOLY GRAIL Make-Up Brushes (Top 10)


Make-up brushes are so key in my kit. Without good brushes it makes it a lot harder to do an amazing make-up. I know this sounds like common sense but I have so many friends that don't use hardly any brushes to apply their make-up which is crazy to me, but whatever works for you. Being a make-up artist brushes are my tools. Someone once told me that a plumber wouldn't turn up to fix a sink with the wrong tools so why should a make-up artist. I will never forget that quote! I have a range of brushes from budget buys to high end so I thought I would share the brushes I cannot live without!


1. Original Beauty Blender - £16


The beauty blender was the first sponge I had ever used to apply my foundation with and I was blown away by the finish. This gives me a flawless airbrushed finish to my face and has done on all my clients I use it on. It's a very multi tasking tool as well, I use this for my concealer and have used it for my powder too. I have tried the copies of this but none of them have compared and don't leave the same finish as this. At the moment I only have 1 but I will be purchasing more as in my eyes you can never have to many of your favourite brushes/tools.


2. Sigma Flat Top Kabuki F80 - £18.75


I use this brush as a final finish to my foundation. I have very large pores on my face and I find using this to buff in any final product helps hide them a bit more. If you are after a full coverage look this is perfect and it really buffs the product into the skin.

3. Sigma E40 - £14.99


This is an almost identical dupe to the MAC 224 which is designed to be a 'tapered blending brush.' Although I do use this to add a transition colour into my crease my favourite use for it is to buff in my cream concealers when I am contouring and highlighting and gives me the flawless look I'm sure everyone wants. I will be purchasing about 5 more of these as they are seriously HG material.

4. Real Techniques Setting Brush - £8.99


I use this brush to set my under eye concealer and it's small enough to get right underneath my eyes. While some might not see it as a necessitiy I have really oily skin so if I don't really set underneath my eyes it will end up halfway down my face within about an hour ;) it's also amazing to add a bit of shimmer highlighter to the top of your cheek bones.

5. Real Techniques Contour Brush - £21.99


This brush comes in the real techniques core collection and surprisingly I actually use it for its purpose. It's the perfect shape to get right into the cheekbones and shape the face. If I am travelling I double this brush up as my blusher brush too! Unfortunately you have to buy the set just to get this brush!

6. MAC 129 - £27


Although this brush is pretty pricey as with all mac brushes they are worth it. This was the second brush I purchased from MAC. I use this to apply bronzer where I need it and also my blusher. The shape of it ensures your not left with any harsh lines and blends whatever powder product your using beautifully!

7. MAC 217 - £18


A pretty holy grail staple brush in the blogging world I think. So not much needs to be said apart from, GOODBYE HALF BLENDED EYESHADOW. You could do an absolute show of your eyeshadow and this will blend it right out! I need about 10 of these in my kit I use them so often! If you don't want to fork out the full price of this brush, crown brushes do a very similar alternative called the c433. The only difference is I found the crown one a bit scratchy on the eye but it still blends beautifully and it's a fraction of the price!

8. MAC 266 - £16.50


Eyebrows are my thing. If I don't have my eyebrows done then I'm not leaving the house. Some people hate how I do my brows but I am a firm lover of a the scouse brow and I'm not ashamed to admit it. As said in a previous post I always out line my brows with Anastasia Beverly Hills Brow Wizz then I fill them in with my HD brows powder. This brush is the perfect shape to get them precisely filled in.

9. MUA Concealer Brush - £1.95


This brush is a complete bargain. This was £1.95 which is insane. It doesn't feel cheap and I think it looks really sleek. I use this brush to put concealer round my brows and also tidy up my lips after putting on a bold lip. And for the price can you really complain about anything?

10. MAC 239 - £20


I use this brush to pack on colour onto my lids. It's really packed with bristlesand dense enough to build up colour easily without putting too much one and it being all over your face. It is a crucial brush in any kit as a blending brush isn't really the best for packing on colour
                                               

So there we have it, I'm quite impressed it's only 10 brushes to be honest. I thought I was going to end up with about 25 brushes. If I was going away for a weekend these are the brushes I would pack without hesitation.

I'm still looking for the 'perfect' brushes for other purposes, for example my eyeliner brush, every one I have tried hasn't blown me away. I'm hoping to pick up the MAC 210 brush in the next couple of weeks which has amazing reviews for gel liner. I'm also on the lookout for a new lip brush, so if you have any recommendations please let me know!

I hope this post was helpful! I would love to hear what your brushes you could not live without!


21.11.13

Lush Let The Good Times Roll


I am a sucker for any new products when it comes to Lush, I seriously can't speak highly of them enough. Everything I have tried from there has always blown me away. The only thing I don't really buy from there is the bath bombs which is strange as that's the most common thing people buy from there. I have tried them and loved them i'm just not really a bath person and never have been.

One thing that stood out for me is the face cleanser 'Let the good times roll.' Although this has been brought out in the Christmas collection I believe this is going into the permanent line which makes me very happy! I love trying out new cleansers and switching up my skincare products as I am a firm believer if you use the same products religously your skin will just get used to it and the products won't do their job as effectively.

Lush describe this product as ''Let The Good Times Roll is a gentle treat for the skin, leaving you soft to the touch with a lingering buttery caramel popcorn fragrance – when you look and feel this good you can give your Body Double the day off!''

Firstly this smells AMAZING! I have never had a cleanser that smells so divine. If it was safe to eat I totally would, it smells just like caramel. Secondly it leaves my skin feeling so soft. After using this I don't even feel like I need to use a moisturiser. It has Popcorn (yes really) in which is a really nice but not to harsh exfoliater on your face. With most lush cleansers they come in a hard form and you add a bit of water to a pea sized amount on your hand till it forms a paste consistency which you then rub over your face. It's strange at first but you soon get used to it! 

I have oily skin which is acne prone but is still quite dehydrated and I feel this cleanser really adds moisture back to my skin and gives me a really nice glow without making me any more oily than I currently am. I think this product would be suitable for all skin types! As all the ingredients used in lush products are fresh the expiry date isn't that long. I bought mine last week and it expires in January. I will definitely be getting my use out of it though! 

My skin care routine is predominantly Lush so if you would like a post on my full routine please let me know! 

Have you tried anything from the Lush christmas collection? I would love to hear your opinions on what I can get next!

You can pick up Let The Good Times Roll here for £6.35.